Sunday 17 February 2013

Naked Carb Bodies

These carb bodies are 100% naked.  There is not a single item in them or on them.  They are as they were when they were first cast.  That means I can boil the crap out of them.  Literally.  Don't you just love the smell of boiling carbs first thing in the morning!
 
 
And now this is what they look like:

  Some of them have quite a bit of this white powdery stuff on them but after than boiling with lemon juice, there is no grease, oil of other contaminants anywhere.


 So the next step is the clean up the lids and bowls and prepare this little lot for Ultrasonic and Vapour Blasting.

Saturday 16 February 2013

Some Butterfly Capers

Getting butterfly valves out is somewhat tricky.  Do not attempt this unless you are sure about what you are doing (btw I wasn't sure and it didn't stop me - you have been warned) or you have the insurance of a back up set of carbs (which I did).

Firstly, you really need the JIS (Japanese Industrial Standard) crossheaded screwdrivers.  If you are to unscrew the screws holding the butterflies in, you want to be sure you are not going to strip them.  You cannot get a Dremel, or risk putting a drill, down the throat of one of your carbs.  

The screws are burred over on the other side of the butterfly to stop them coming undone.  I never found this to be a problem.  The problem was getting sufficient grip and pressure on the screw without damaging anything else.  Any stiffness in the screw is a result either of them just having been put in very tightly or they may have even used some locking cement during assembly. Burring over just makes them tight as they pull through the threads but it does not hold them tight against the stainless steel throttle rod.

You will need to apply a good deal of pressure on these screws but you do not want to bend the stainless steel throttle valve rod.  You won't be able to get the butterflies to seat properly again if that happens.

This is what I did:

First use your concoction to permeate into the screw threads. I can't underestimate how much easier this stuff makes it.
 Then we need to construct a throttle rod support.

I got a suitably sized piece of wood that was about half an inch longer than the distance from the underside of the butterfly valve to the airbox end of the carbs.

 It needs to be able to fit down the throat of the carbs and rest on the throttle valve rod and extend out of it at the airbox end.
 This piece of wood will provide the resistance to the force you are going to apply getting the screws out.
Like this:
 Here are the screws and you can see the marks on them where they have been burred over to prevent them coming lose.  Haven't got any idea yet how I am going to be able reassemble this little lot and how I get them burred over again.  Oh well.  We'll meet that when we get there (click to enlarge images).

Once you have the screws out and you have taken the butterfly out, you will need to release one end of the rod to be able to pull it through.  For carbs 1 and 4 you simply remove the cap, undo the circlip and push the rod through.


 Then take out and replace these seals.
I read somewhere that it is a good idea to count the number of times the springs have been coiled so that you know how much tension to put on them when you get to reassembly.  I have my insurance set of carbs at hand so I didn't need to do this.
 On carb no. 3 you need to flatten the retaining disk and unscrew the nut attached to the throttle rod.
 I didn't want the force of unscrewing the nut to put pressure on the butterfly which in turn may damage the surface of the venturi. So I tried several methods of preventing the rod from turning. This method caused the butterflies to start bending and was obviously putting too much pressure on the stainless steel throttle rod.
 But this method proved satisfactory. A piece of timber between the carb body and the metal thottle plate, which is notched into the throttle rod, gave all the support needed without pressuring any component unduly.
 Take the nut off and the retaining disk.
 Then remove the aluminum washer
 and the bracket.
 There should be a seal under there but there wasn't in mine!
And finally for carb no. 2 you will need to punch out the pin that holds the part onto the end of the throttle rod. Getting the right sized punch is the trick here.


Carburetor Break Down Part 5 (Day 182)

This is becoming a mammoth job.  The deeper in you get the more you realise how difficult this is all going to be to put back together again.  Ever since I can remember, things have been easier to take apart.

Sometimes we have little victories and sometimes we have little disasters.  Today I had both and they weren't little either.  Carbs 1 and 4 had been straightforward, now I was onto carb no. 3.  This has been my toughest challenge so far in the whole project.  Pretty soon I will be an expert at drilling / dremelling out nasty screws and jets.

I had 2 things go wrong today; firstly the air pilot jet would not come out of this carb so it had to be drilled.  Secondly, one of the screws on the bracket that is attached to this carb would not come out either.  The bracket is part of the mechanism that attaches the throttle cable to the carbs.  It provides the resistance so that when the throttle cable is pulled the butterflies will open.

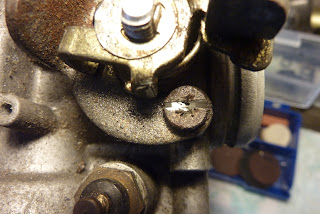
This is my no. 3 carb and the pesky screw location (click to enlarge):
There is a top one and this is the bottom one.  Top one came out with concoction and brute force on the screwdriver

The bottom one wouldn't.  Now I have ordered a set of JIS screwdrivers from the USA but I also found one I already had that seemed to be a good fit.  So rather than wait (patience will get you over most problems I now learn!) for the correct tool to arrive to do the job, I thought I was smarter than that, I could do it with mine.  A mangled head was the result.

No problem.  I have dremelled new slots in pesky screws before.  I will do it again.
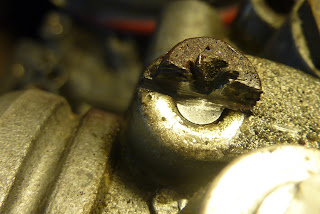
 Nice slot I think.
Except I went too far.  Now the slot has eaten into the carb body.  This in itself is not the end of the world but what it means to the screw head is a disaster.  The top (thick) part of the screw is no longer able to be used as part of the unscrewing process.  All the force of the screwdriver will now be on the weaker part of the screw.  Guess what happens then?  Get a nice fat and wide screwdriver, apply a bit of force and:
the head breaks in half. Another disaster.  So get the Dremel out again (I use it so oftern now it lives on the workbench) and cut the other half off.  That way the bracket will come off and there will be part of the screw proud of the carb body.  Then you Dremel another slot.  This time remembering not to go too deep.
 Get a good fitting screwdriver and give it another go.
 But it starts splitting apart already.
Then half of it splits off completely.  We are left with the mole grip option.
I've read of people using this option but for the life of me I cannot see how it would ever work.  If it wasn't going to come out with a screwdriver I was never going to get enough grip on it with a mole grip to make any impression.  Another fail.  This booger is only going to come out with a drill.  So, Dremel the top flat, punch a starter hole and get drilling.  So glad I got a Dremel for Christmas.
 Starting to drill.  I began with a very small drill using the punch hole as a guide to keep the drilling central.  All this is done with a hand drill.  It would be a lot easier if a had a bench drill.  But I am about trying to make do with what I have.
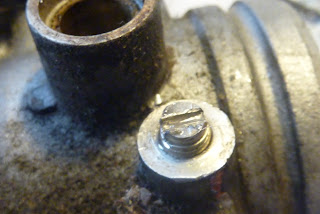
 It's all coming out now.
And the thing to do is not to lean on the drill too heavily ........
otherwise you might just drill straight through the carb!  Although this looked at first to me like the end of the world as we know it, I do believe that it is not quite so cataclysmic. No. 2 carb has a similar hole in it that provides the vacuum to the petcock.  What that tells me is that the venturi will not be compromised by an aperture at this location.  This is the aperture used by the petcock vacuum hose in no. 2 carb.
 And this is the one I have just made.  I am sure it won't disturb the operation of the carburetor.
Then I had to get the remaining bits of the screw out of the hole.  That meant a bigger drill bit.  As soon as I put this in and turned it a few times, it all came out
  apart from a little bit that needed to be hoiked out with the bent paper clip trick
 Out you come. Gosh why did I decide to go on the wagon for lent?  Could use a beer right now.
The new screw that I will now have to get for the throttle bracket, will fit nicely into the hole that I have just drilled out.  I tried it with the other screw.  It is clear that I have not damaged the threads that were in it so I can assume that there will be no air leak.

You may be wondering just why I am being so obviously over ambitious with what I am doing.  I am determined to take this thing back to the very nuts and bolts from whence it came.  I want to learn all I need to know on the way and I have a secret weapon .......
a completely new (well used but new to me) set of carbs that has just been flown in from California (I live in the UK).  Picked up for a very reasonable sum and brought over to the UK for $25.  This is my insurance policy.  If anything goes wrong I have a complete set for spares.  I can use it for spares or refurbish them and use them instead.  It also means I have a control set that will show me how to put my original set back together.  Even though I have had some trials taking these carbs apart, I do believe that putting them back together is going to be even more testing.  So having a spare set is going to be a real blessing down the road.

Oh and I had to get out a stripped air pilot jet.
 Start with a small drill and then get a bigger one.
 I used the "tape on the drill bit" trick to try and prevent over drilling.
 Then it all came out nicely.
 However, after measuring the depth of the hole, the depth of thread and testing it with another pilot jet, I can report that I drilled too far and took out most of the threads.  I can now only turn the pilot jet 1 and a half turns before it hits bottom and this bottom is about half a mm deeper than the bottom on an unmolested carb.  I am going to have to get this one drilled and have a helicoil or insert put in.  If this is even possible.
 Otherwise my no. 3 carb body is toast.  Wow am I glad I paid out for insurance.